| |
Running the MDM demo
Description: This page describes how to run and interpret the MDM demo.Tutorial Level:
Next Tutorial: Implementing a State Layer
(Note: the following tutorial has been tested in ROS Indigo and Hydro).
In the following, we assume that you have downloaded the MDM metapackage from https://github.com/larsys/markov_decision_making.git into a working Catkin workspace, compiled the respective workspace with catkin_make, and updated your environment variables.
Then, you can run the demo:
roslaunch mdm_example ISR_demo.launch
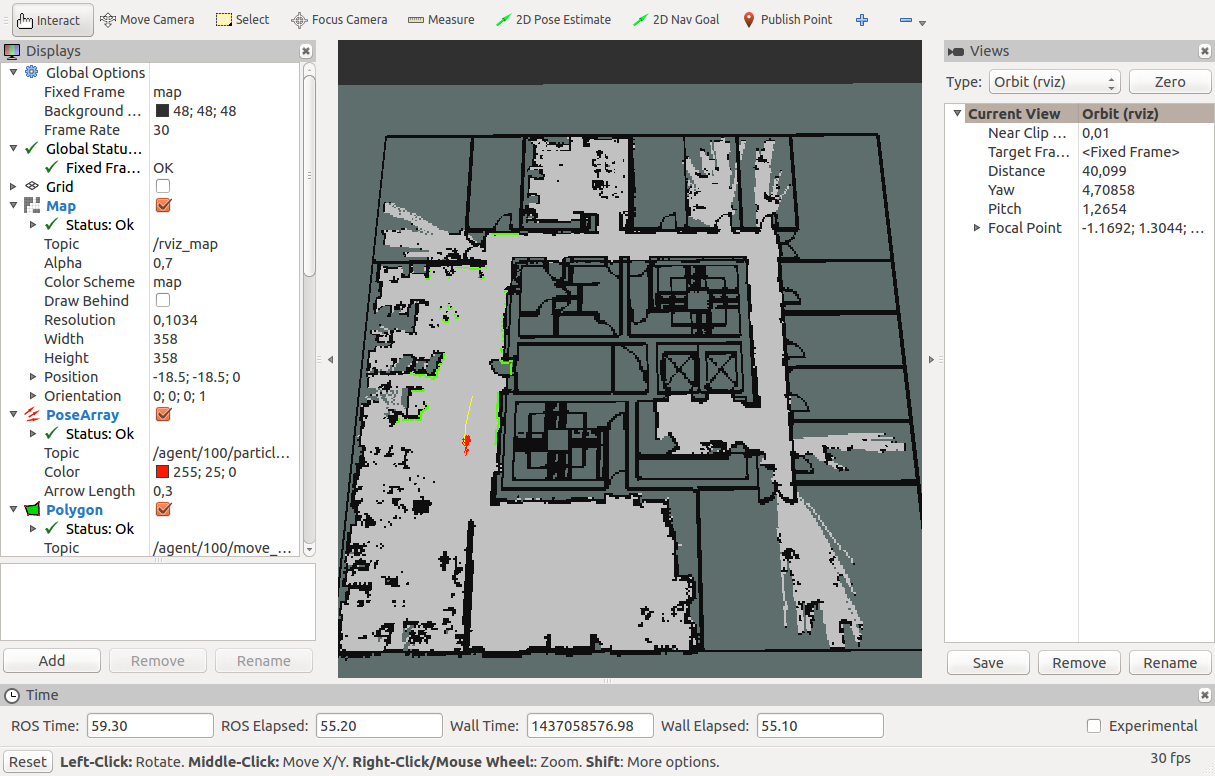
Once the demo is running, Rviz will show up, and your view should be similar to the following screen capture:

In this window you can see a small Pioneer 3-AT robot, simulated in Stage, patrolling its office environment. The robot follows an MDP policy, which is saved as a plain text file in 'mdm_example/config/MDP_policy'.
In the particular case of MDPs, a deterministic policy can be written as a simple array, which specifies the index of the action that the agent should take, for each state in its model of the environment. The file looks like the following:
[12](0,0,0,1,3,1,1,1,1,2,0,0)
This array is written in the boost::ublas::io format. For different decision-theoretic frameworks, the policy may need to be written in a different format.
While the demo is running, you will be able to see the following important ROS topics:
- /agent/100/state
- /agent/100/action
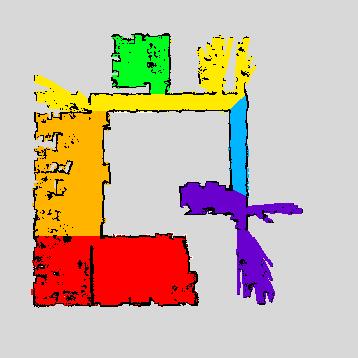
By echoing these topics, you can see the state and action of your agent in real time. The state of the system is being computed by means of the topological_tools package. Open the file 'mdm_example/maps/ISR_label_map.png'. It will look like the following:

This figure is actually a copy of map that is being used for navigation by move_base, but colored in such a way as to distinguish the different topological regions of this environment. Each color corresponds to a different named state. This correspondence is specified in the file 'mdm_example/config/predicate_labels.yaml'.
During execution, a pose labeler node returns the text label associated with the current position of the robot. Then, the main predicate_manager node converts that label into a logical-valued predicate, symbolizing the fact that the robot is in the respective room. The State Layer for this problem then converts that logical-valued representation into an index of a state of our MDP. This state is mapped to an action, through the policy that we saw above.
The action, in turn, is mapped into a move_base goal, through the agent's Action Layer, again by using utilities from the topological_tools package. The file 'mdm_example/config/topological_map.xml' contains an XML description of the topological layout of this environment (a connected graph) and the representative positions of each of these topological areas. Each time that the robot takes an "action" in one of these "states", it recovers a specific goal pose from the topological map, which is then sent to the navigation module of the robot, completing the loop.
Note that, although this example makes heavy use of tools and concepts that make sense only in topological navigation problems, this is merely for explanatory purposes -- the library is by no means restricted to this class of problems. The important message of this example lies in its control flow, which is generic across all MDP-based agents: first, the sensorial data (or features computed from that data) of the robot is mapped into a "state" or "observation" that is compatible with our decision-theoretic representation of the environment; a control policy then maps that state or observation into an action; and that action is then mapped back into a control signal that makes sense for the robot.


